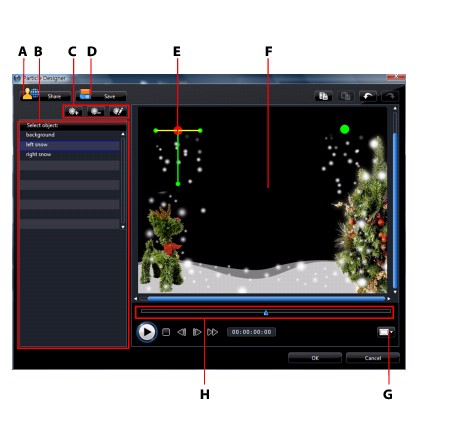
Modifying Particle Effects in the Particle Designer
A particle effect allows you to insert particle objects (snow, dust, etc.) onto an existing image or video clip in your video, effectively overlaying a picture-in-picture effect on the existing clip.
You can completely customize the particle object properties using the Particle Designer.

To open the Particle Designer:
- select an particle effect on the PiP Track and then click Modify.
- within the Particle Room, click on
 to create a new Particle effect template from scratch by importing a custom image.
- within the Particle Room, select an existing particle effect template and then click on
 to edit the existing template.
Modifying Particle Object Range and Position
You can change the range, position and orientation of each particle object. Increase the range of the particle object to cover more of the background (master video), or modify the position or direction particles fall/emit from their source point.
To modify its range, direction, position or orientation:
Adding Particle Objects and Background Images
You can add additional particle objects to a particle effect template or insert a custom background image. To do this, click on  and then select what you want to do from the list. If you add a new particle effect, the particle object properties area opens. If you import a background image, it will replace the current background completely.
Editing Particle Object Properties
To edit a particle object’s properties, select it and then click on  .
.
|
Note: if you select the background image to edit, the only option available is to replace it with a different image. |
Within the particle object properties tab, you can:
- Select emit method: select how the particles emit from the source point. You can have them emit from a single point, from a line, or spray out in a circle. You can also import an image to create a masked area where particles emit from. Depending on the mask you import and how you resize it, the particles will emit differently.
- Select particle style: select the style of the particle object. Depending on the property you select, the particle shape and behavior will change. Select the style that best suits the effect you are trying to accomplish.
- Add/Delete particle: within this section you can click on
 and then import an image to create custom particles. You can add as many custom particles as you like, or select an existing particle and then click
  to delete it from the particle object.
- Modify parameters: within this section you can completely customize the properties of the particle object. Everything from the particle emit rate (number of particles being emitted from the
source point), speed of the particles, display time (life time), size, wave (path) and rotation. Set all of the parameters to best suit the effect you are trying to accomplish.
Adding Motion to Particle Objects
Within the particle object motion tab you can add motion to a particle object, allowing the particle’s source to move across the screen. You can choose from a number of predefined motions or create your own custom motion. The motion properties of a particle object is similar to a PiP object. See Adding Motion to PiP Effects for detailed information on customizing a particle object’s motion.
Saving and Sharing Particle Effect Templates
Once you are finished modifying your particle effect template you can save it to your Particle Effects Library for future use or upload it to DirectorZone to share it with others.


