Slideshow Designer
The Slideshow Designer is the easiest way to take your photos and turn them instantly into a dynamic slideshow. Drag all the photos that you want in the slideshow into the timeline, make sure they are selected, and then click on the Slideshow button to launch the Slideshow Designer.
Within the Slideshow Designer you can select from a number of slideshow templates. Each template will create a completely different type of slideshow. Click Next to go to the preview window and see the outputted result. You can then return to the previous window and select another template if you like.
Slideshow Music
To add background music, click  and then select the audio that you want to use.
Music Preferences
If you are using background music in your slideshow, click on Music Preferences to configure the preferences as follows:
- trim the audio file using the playback controls and then move the sliders on the trim bar to the desired start and end points.
- during playback of the background music, click
 to mark the starting point of the music and then
  to mark the end point.
- select to have the background music gradually Fade-in or Fade-out.
Slideshow Preferences
Click on Slideshow Preferences to configure the preferences for your slideshow as follows:
- Duration: use this option to set the length of your slideshow. Select Fit photos to music for the length of the slideshow to match the duration of the selected music. Select Fit music to photos for the length of the music to match the duration of the auto created slideshow.
- Sequence: use this option to set the photo sequence for your slideshow. Select Timeline order to have the sequence match the order the photos are currently displayed in the timeline. Select Date/time taken for the photos to display in chronological order based on the date and time they were taken.
Customizing Slideshows in the Slideshow Designer
Some slideshow templates let you manually customize slideshows in the Slideshow Designer. Once the slideshow is created, if the Customize button is visible in the preview window or when the slideshow is selected on the timeline, click it to launch the Slideshow Designer.

The editing options and tools that are available in the Slideshow Designer, depend on the slideshow template you selected. The following outlines the editing options for each of the templates in the Slideshow Designer.
Cell Slideshow
When customizing a cell slideshow in the Slideshow Designer, you can perform the following functions:
- in slide area, click on a specific slideshow slide to view and edit it.
- in the preview area, click and drag a photo to an alternative cell.
- in the editing area (Unused photos), click the Add Photos button to import additional photos for use in the slideshow.
- in the editing area (Unused photos), indicate the maximum number of photos that are displayed on a slide.
- in the editing area, drag and drop the photos from Unused photos to the cell in the preview area where you want it on the slide. You can also highlight a cell by clicking it and use the

 buttons to add or remove selected photos.
- in the preview area, select a cell with a photo and then click on the
 button area to set the focus of that cell on a specific portion of the photo.
- in the extra tools area, click the Remix button to generate a new version of the slideshow.
- in the preview area, use the playback controls to preview the slideshow.
3D Slideshow
When customizing a 3D slideshow in the Slideshow Designer, you can perform the following functions:
Highlight Slideshow
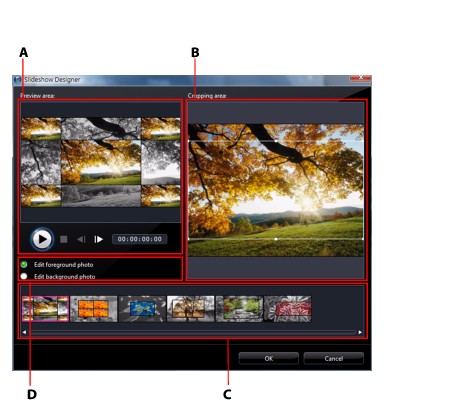
When customizing a highlight slideshow in the Slideshow Designer, you can perform the following functions:
- in slide area, click on a specific slideshow slide to view and edit it.
- in the extra tools area, select whether you want to edit the foreground or background photo.
- in the editing area (Cropping area), resize and drag the box to the area of the photo you want highlighted on the slide.
- in the preview area, use the playback controls to preview the slideshow.
Motion Slideshow
When customizing a motion slideshow in the Slideshow Designer, you can perform the following functions:
- in slide area, click on a specific slideshow slide to view and edit it.
- in the editing area (Cropping area), use the Magic Motion Designer to customize the motion on the slide. See Magic Motion Designer for more information.
- in the preview area, use the playback controls to preview the slideshow.